This was my biggest sewing project to date that I made back in April this year. A lined hooded jacket with button up closure and pockets! (I like pockets and reckon more items of clothing should have them)
The patten I used is Papercut Pattern’s Waver Jacket. I bought it as a PDF to download and assemble, but it is also available as a physical paper pattern on their site. It comes in a short and long hem variation and optional drawstring cord at the waist. I made the short version.
The pattern comes in sizes XXS-XL. I went with XS and it is still roomy enough to comfortably layer up underneath.
The outer fabric is medium weight red cotton drill and the lining is a navy blue polyester satin. I purposely chose a slippery lining fabric to make it easier to slide my arms in and out and avoid friction and bunching when layering up with jumpers and cardigans underneath.

The instructions are quite clear with good images as a guide. When I got to the part where I was to attach the lining to the outer shell, I had to carefully read and follow the instructions. Some sewers who blogged about their experience making the Waver Jacket used other methods to ‘bag a jacket lining’. I was able to follow the provided instructions though found that the lining and outer shell fabric did not quite meet up perfectly at the centre front where the centre and bottom hems meet. Most likely due to an error made by me as the pattern and instructions are well made and tested. And it was nothing some hand-stitching couldn’t fix.

I also had a little trouble getting my sewing machine buttonhole setting and foot to work and ended up doing the short zig-zag stitches method. Other challenges included finding a good eyelet kit (the metal ring where the drawstring cord comes out, see photos below). The basic set sold in Spotlight that requires a hammer to insert the eyelets is terrible as they would deform on seating. I ended up finding a good set from a brand I have used before at Lincraft. Perhaps with a proper handheld eyelet tool the Spotlight ones may have worked better. But as I don’t use eyelets very much, I couldn’t justify buying one.

Some alterations/additions to the pattern I made include an added zipper panel, lined pockets and a loop on the inside neckline to hang up the jacket.


The buttons and cord toggle/clasp I made from oven bake clay.

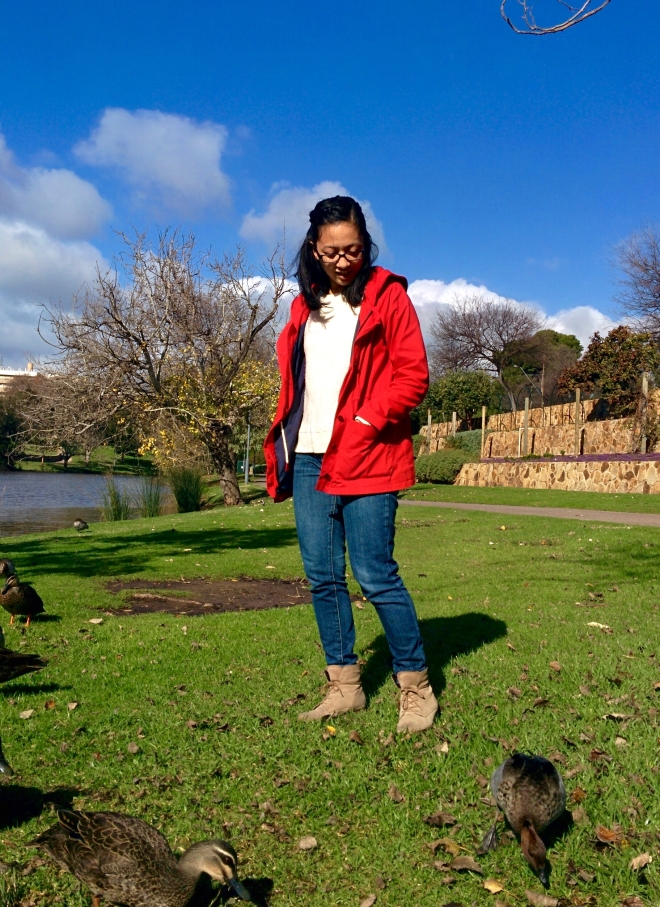
This project took me 3 weeks to complete (not including the weeks it took me deliberating over fabric choices) and I finished just in time for the late Autumn/Winter season! I learned new techniques of using fuseable lining and open-end zippers as well as following the long detailed pattern instructions.
Thank you to my sister for helping take the photos by the Torrens River with ducks!

Hi, it looks wonderful! :-). I like what you did with the loop 🙂 – I’ll keep it in mind for my next version :-).
I also had the same problem with the lining at the bottom center corner and I checked the fabric against the paper pattern and it was identical to the paper pattern piece so I think it’s an error in the pattern. I used a paper version size M which I bought in 2015. For size M the lining is also too long on both front and back – about 2cm. The neck facing also had a problem in size M: it was 2cm too short. So I had to add an extra piece in the middle back part of the neck facing (4cm extra as I needed a 1cm seamallowance to attach it to the original neck facing pieces). So.. I think it’s the pattern and not you ;-).
LikeLiked by 1 person
Hi Chantal, Thank you for your comment! If I make it again (maybe the long version), then I will add a bit extra length to the lining. Thank you for visiting my blog! 🙂
LikeLike
Good luck with your next version :-). Love your blog – will follow :-).
LikeLiked by 1 person
Thank you! 🙂
LikeLike
Gorgeous! Can you help me find the tutes where gals bagged it, rather than used PC’s instructions?
Also, how did you add the zip? Did it become too bulky while sandwiching all those layers?
I thought about using a centered zip and adding a zip guard, omitting the button placket (I loathe sewing/wearing buttons!)
I have the Kam Snap table top press, so snaps and eyelets are meh, easy. But I’m saving hardware for the Kelly Anorak.
I’m making the Sewaholic Minoru (NOT for us busty gals!), the Waver and Kelly to see what I like best, then do a good mashup. I love mashups!
Your jacket is FAB and congrats on your make!!!
Xoxo
Jenny
LikeLiked by 1 person
Hi Jenny, thanks for visiting my blog 🙂
This is the tutorial I saw a lot of other sewing bloggers used to bag the jacket: https://www.grainlinestudio.com/2012/01/09/sewing-tutorial-how-to-bag-a-jacket-lining/
As for the zip: I added it on when I had completed the outer shell. the zip is sandwiched it between two rectangles of fabric (no interfacing to reduce the bulk), sewn right sides together with the zipper teeth facing away from the edge, leaving only the longest edge opposite to the zipper open/not sewn, then turned right sides out. To get the measurements for rectangles of fabric, I wore the jacket and measured the width of space between where the lining meets the outer shell to the centre front. A bit of estimation is required here. I then basted the panels to the outer shell where I wanted them. Tried it on again. When I was happy, I trimmed the zipper panels equal to the raw edge of the jacket shell (where it will be sewed to the lining). Then continued with the pattern instructions. It wasn’t too bulky as i didn’t place interfacing. If you are concerned about bulk, then the zipper panels could be made of a lighter weight fabric, or only the outer facing fabric be the same as the shell while the inner facing fabric be a thinner fabric. Does that make sense?
I also am not the biggest fan of sewing button holes. I think if I were to make it again, I would try using snap buttons.
Good luck with your makes!
LikeLiked by 1 person
Ok, so you didn’t use PC’s method, but instead bagged it per Grainline? Because everyone’s having problems with the mitered corners! I don’t quilt and mitered corners are a nightmare for me!
Did you have problems in the bust or were your measurements spot on? I just loathe an FBA on raglan sleeves. Gosh, I sound like I’m full of hate😆
Ok, so you made a zip guard, essentially. I can draft one; I like to curve the top and bottom, almost like the shape of a mandarin collar.
I’ve got drill cloth, serge, twill and some denim or linen to choose from. I think I’m gonna make it as-is, then give it to my bestie as a gift since we have similar measurements (except she has that pancake butt I’d kill for!) This would be a win-win as I’d have her gift and an idea of fit for me.
I’m going to eventually make it in nylon ripstop, underlined with Thinsulate, lined with flannel and then kasha in the sleeves.
Last question and I’m sorry for hogging your time and taking over your blog, but how was the fit in the shoulders/upper back? I’m stick-thin, but have oddly widely-spaced shoulders. I’m not digging the idea of finding out how to do an adjustment on raglan sleeves.
Thank you, thank you, thank you!!!
LikeLiked by 1 person
I did use PC’s instructions and yes found that the mitered corners did not match up which was disappointing as I had to do some hand stitching and the hem is no longer perfectly straight. Although it isn’t too noticeable when worn. Did you mean you were interested in reading other posts where they bagged it?
Check these out:
http://www.thepugandneedle.com/home-blog/2015/05/my-sewingdare-the-waver-jacket
https://carlyinstitches.com/2015/07/30/papercut-patterns-waver-jacket/
I didn’t need to make any bust adjustments for the jacket. I’m not busty at all though haha. The shoulder fit is fine for me too. I also find the raglan sleeves more forgiving for movement.
I hope I was able to help. Feel free to ask more questions if you need! Lovely to discuss stuff with fellow sewists! 🙂 Will you post it up on your blog? Looking forward to seeing the results if you you!
LikeLike
I’m following you. Good luck on your blog! Didn’t realize you’re Asian, as am I, though I can tell we’re not the same; I’m a Korean/German American.
Anyways, I’m excited for what you have in store! Check out PC’s Rigel Bomber. It’s unlined but there’s a slew of tutes on how to line that baby. It’s a fun jacket and definitely worth spending some money on your zip and ribbing because it’s a lifelong keeper!
LikeLiked by 1 person
Thank you! Just followed you back too. I hope to see your makes posted up! I’ll look up that pattern too. Thanks 🙂
LikeLike
[…] was a great way to use up some of my remnant fabric too! I still had remnant fabric from my Waver Jacket, which you may recognise if you’ve been following my blog from its early beginnings. I […]
LikeLike
[…] the coat that intimidated me. My first (and only) experience of sewing a lined coat/jacket was the Waver Jacket. I had issues with attaching the lining and ended up with a gap between the outer shell and lining […]
LikeLike